
Capyville

The IDE for the AI era: see your agents at work at a glance.

Capyville turns a folder into a little village and shows agents like Claude Code or Codex as capybaras reading, writing and finishing up in it. Run several agents at once and you can see who is doing what on one screen.

Capyville app icon: a capybara face on a yellow background with small houses

How it looks

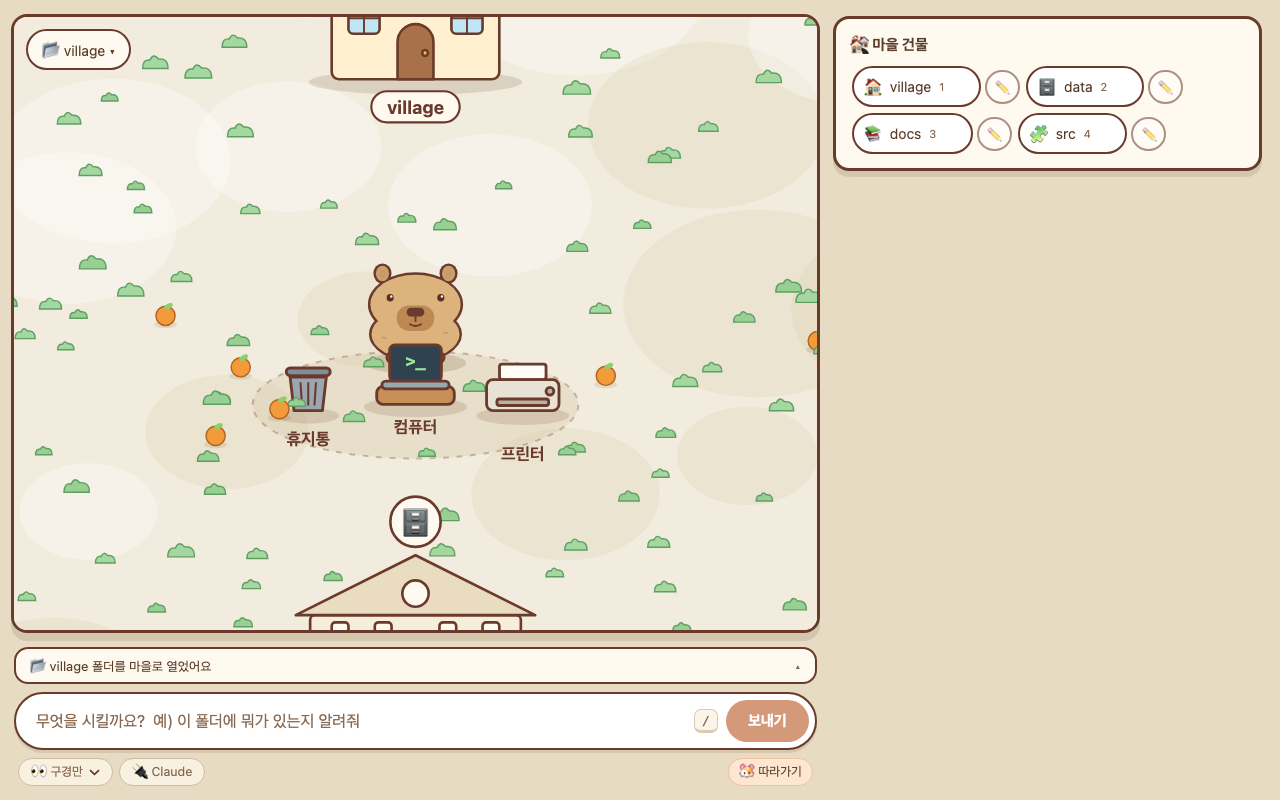
App screen where a folder is a village: a capybara sits with a computer, trash can and printer, with a box below to type a task
The folder you work on becomes a village, and the folders inside it become buildings. Type what you want below.
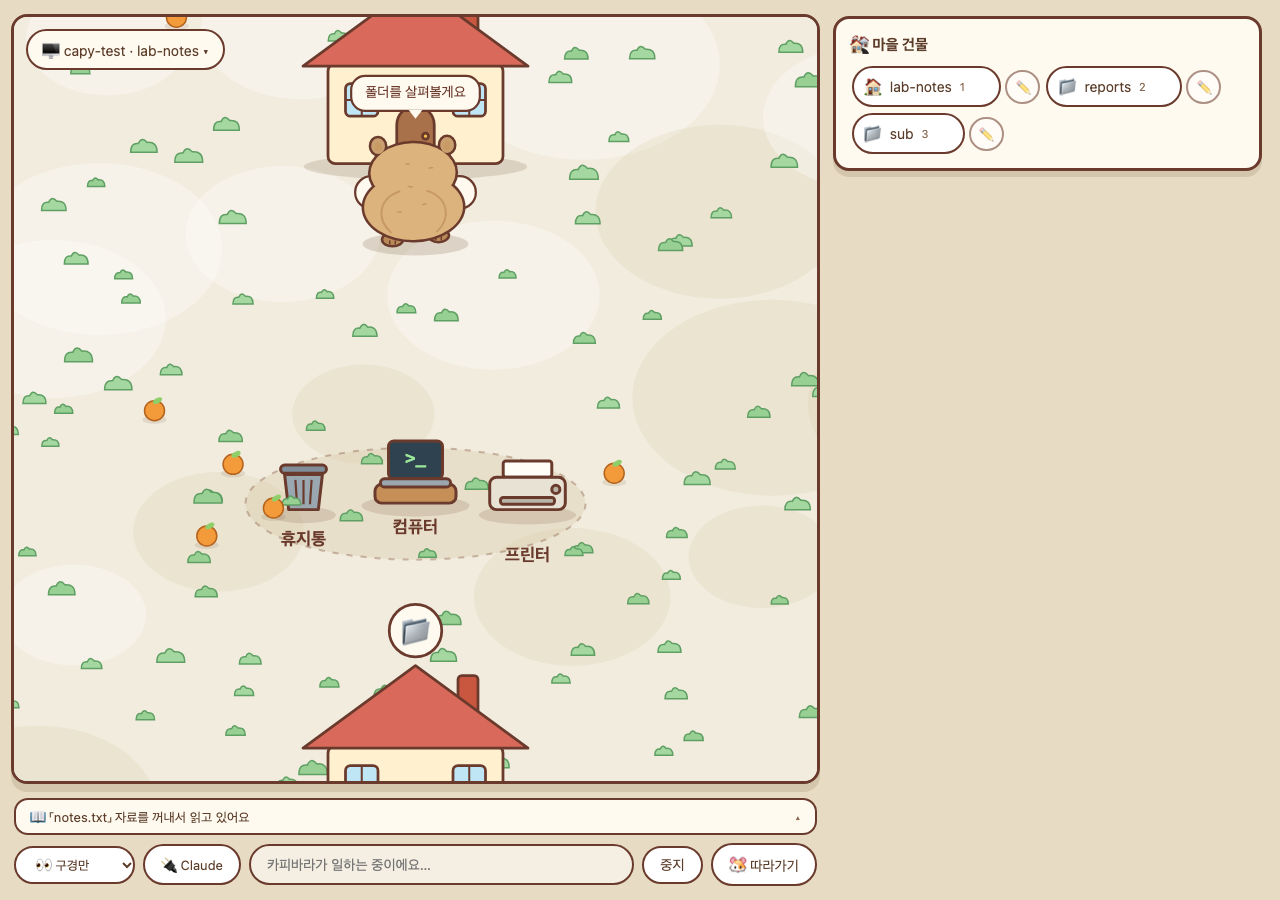
The capybara walking through the village with a speech bubble saying it is looking through the folder
While an agent works, its capybara walks around and tells you what it is doing in plain words.

What it does

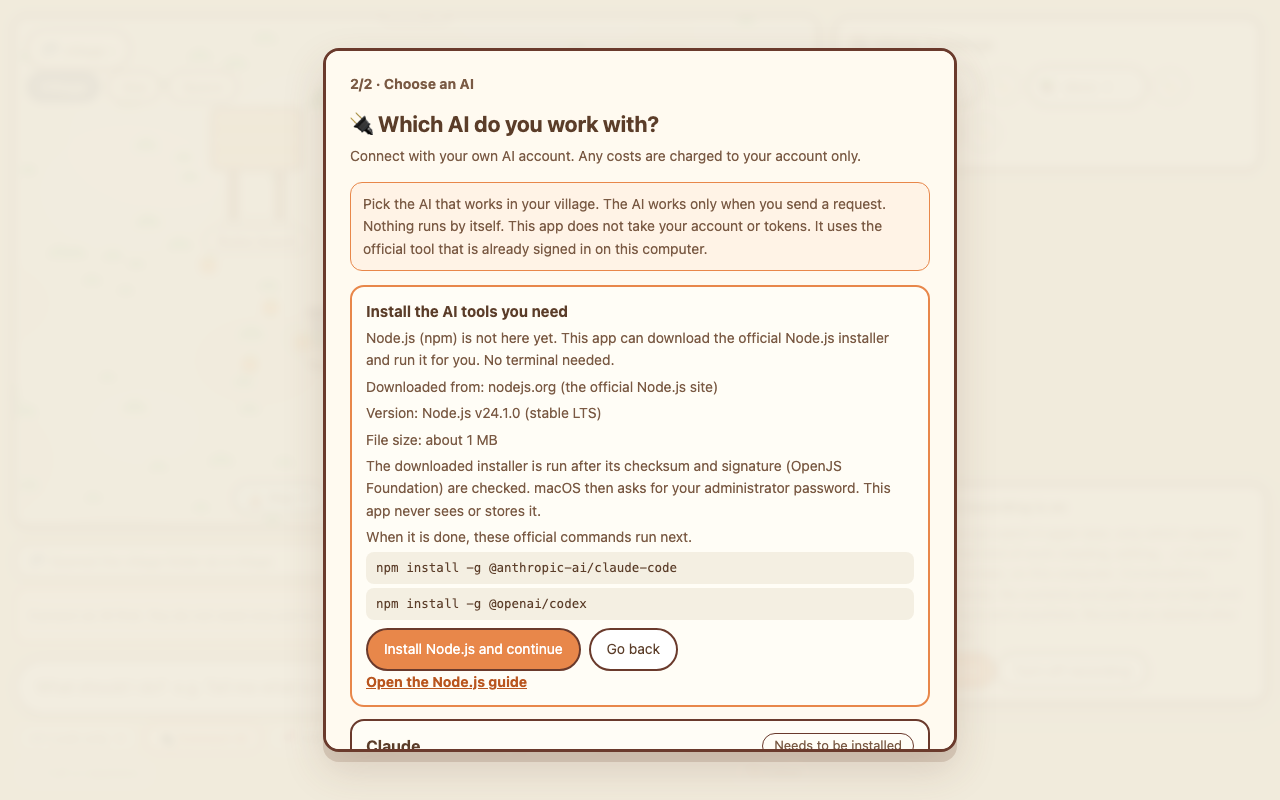
The Install the AI tools you need panel in the Choose an AI window: a note that Node.js is not here yet, where it is downloaded from (nodejs.org) and which version, the two official commands that run next, and an Install Node.js and continue button

Install Node.js from inside the app

Claude Code and Codex need Node.js (npm). If it is missing, the app can download the official Node.js installer from nodejs.org, check its checksum and signature, and run it — after showing exactly what it will download and run, and only when you press the button. On a Mac, macOS asks for your administrator password; the app never sees or stores it. The Windows version is a beta. If you prefer, a link to the official install guide is shown too.
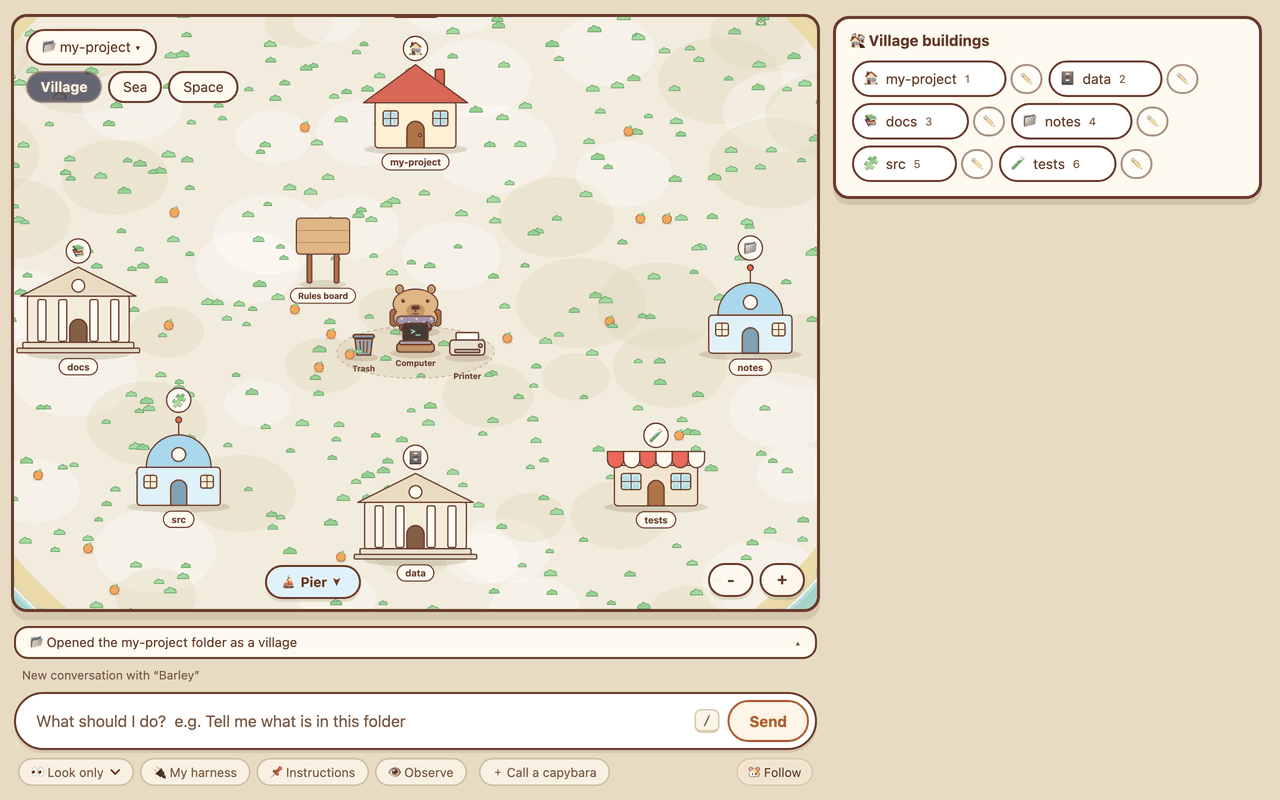
A folder opened as a village: buildings with name tags for each folder are scattered around while the capybara rests calmly in the middle

Your folder, as a village

Pick the folder you work on and it opens as a village. Folders inside it become buildings you can step into to see what is there.

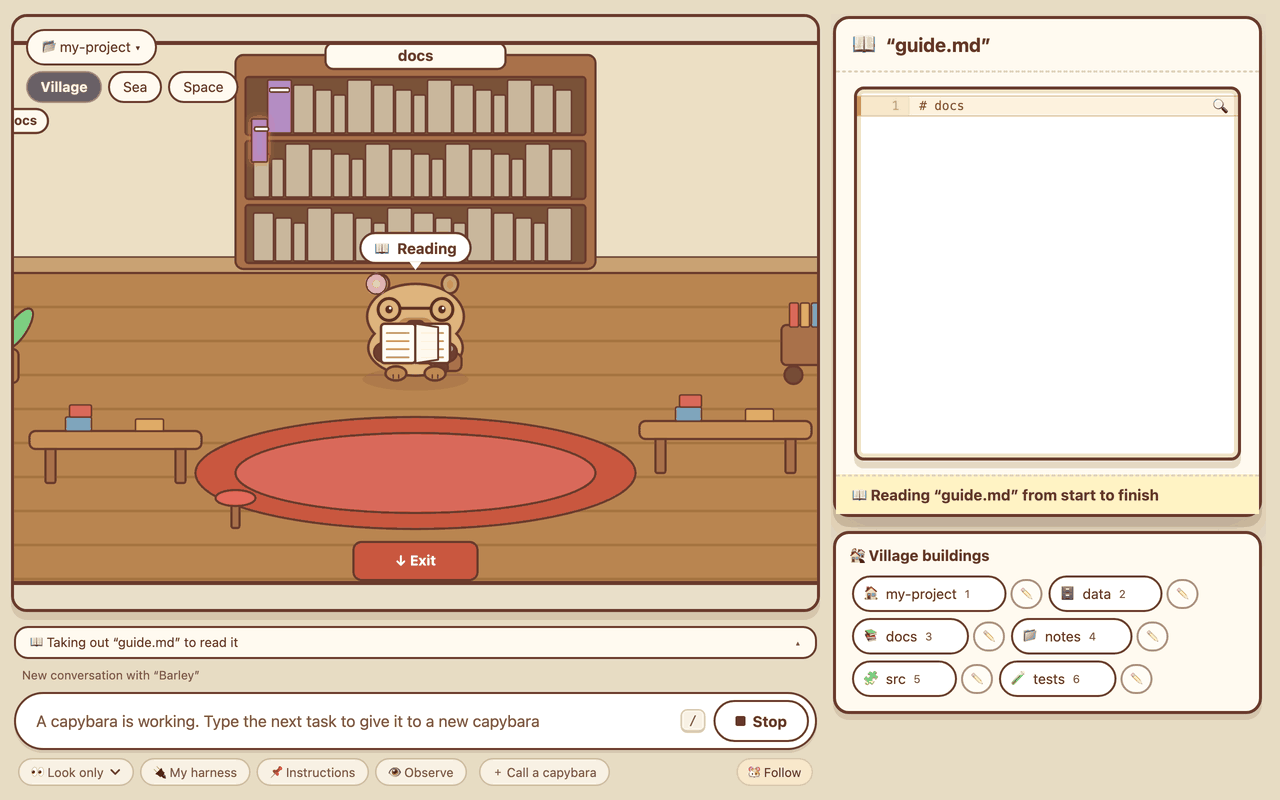
The capybara reading a book inside the docs building, with a Reading speech bubble, a one-line message about what it is doing, and a Stop button

See your agents at work at a glance

Reading a file, writing something, finishing up — each agent’s capybara acts it out and a one-line message says what is happening. A stop button is always there.

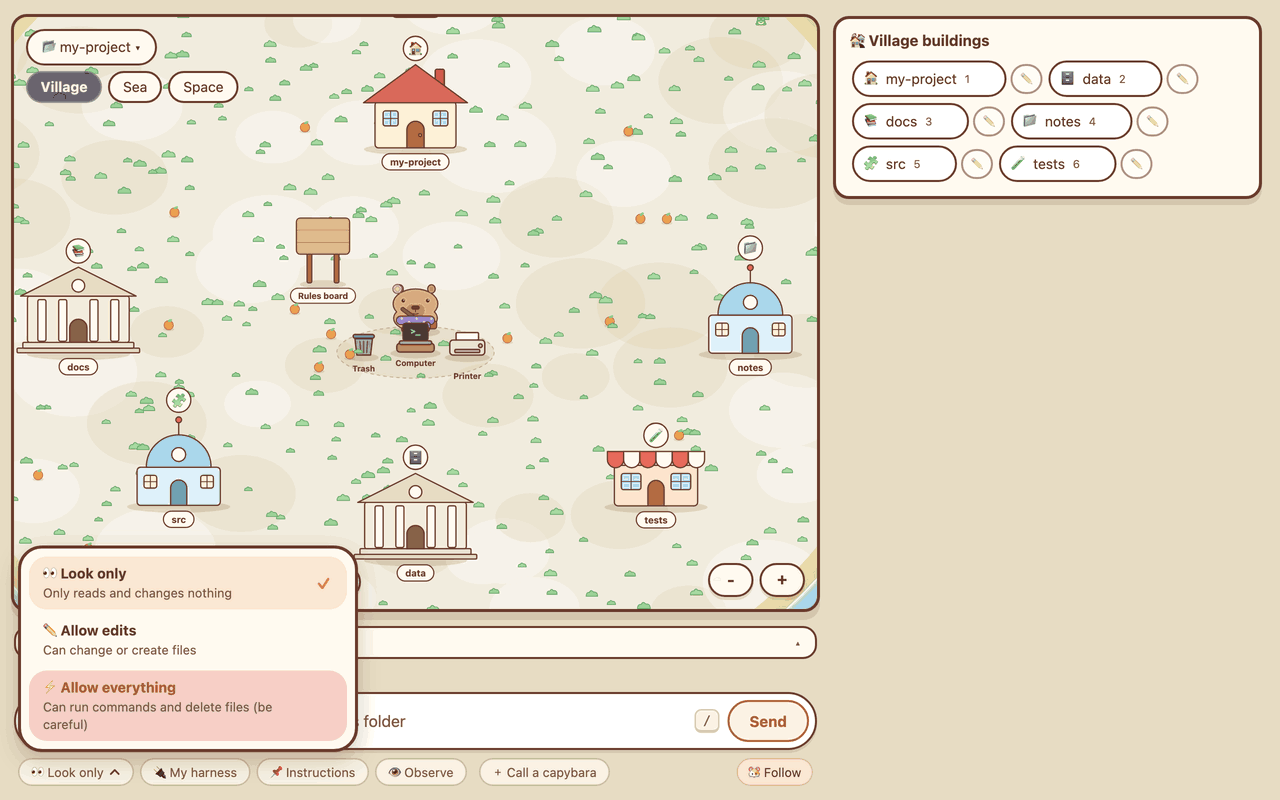
The mode menu opened at the bottom, listing Look only, Allow edits and Allow everything, with a caution note on Allow everything that it can run commands and delete files

Easy safety modes

Choose how much the agent may do, in plain words:

  • 👀 Look only — reads, changes nothing (except Hermes Agent, which can still change files in Look only)
  • ✏️ Allow edits — can edit or create files
  • ⚡ Allow everything — can run commands and delete files; the app asks you to confirm first

The default is “Look only”. Before the most powerful mode is used on another computer, the app asks you first in plain words.

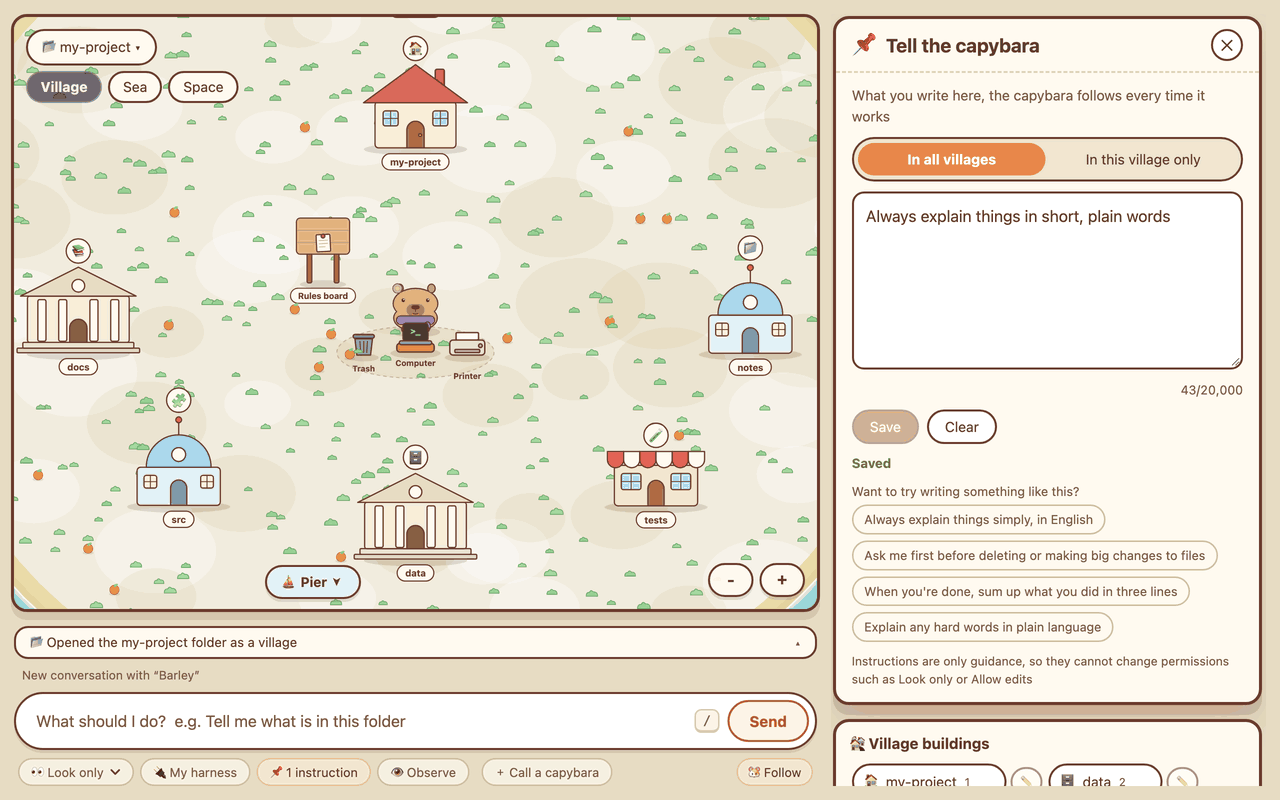
The notice board instructions panel with one rule typed in, and tabs to choose between all villages or only this village

Leave instructions on the notice board

Write instructions once — like “always explain simply” — and the agent follows them every time it works. Keep them for all villages or for one. Instructions are only guidance: they cannot change what the agent is allowed to do — that is set by the safety mode.

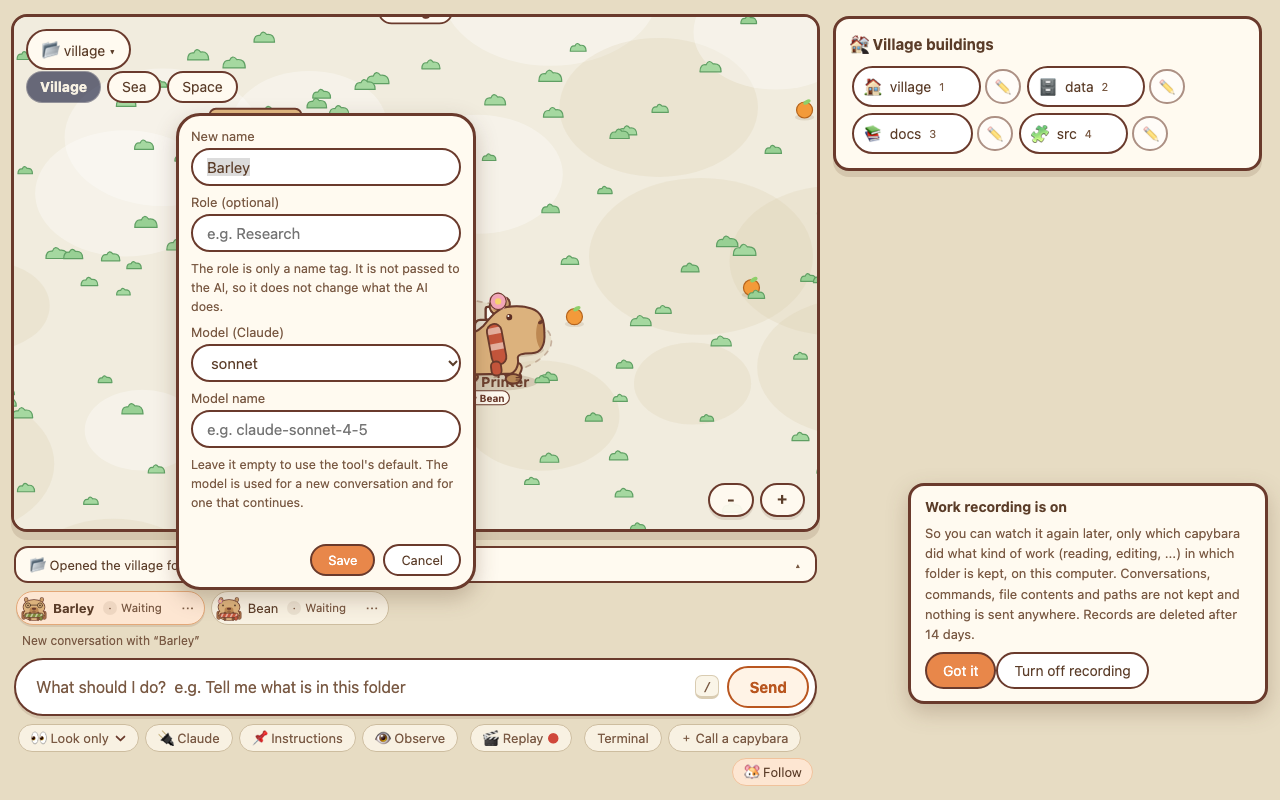
The model choice in the capybara rename window: new name, role, a Model (Claude) menu and a model name box, with Save and Cancel buttons, and two capybaras in the list below

A model for each capybara

In each capybara’s rename window you can choose which model Claude Code uses for that capybara from a list, or type a model name yourself (Codex takes a typed name). Leave it empty to use the tool’s own default. The model is used for a new conversation and for one that continues.

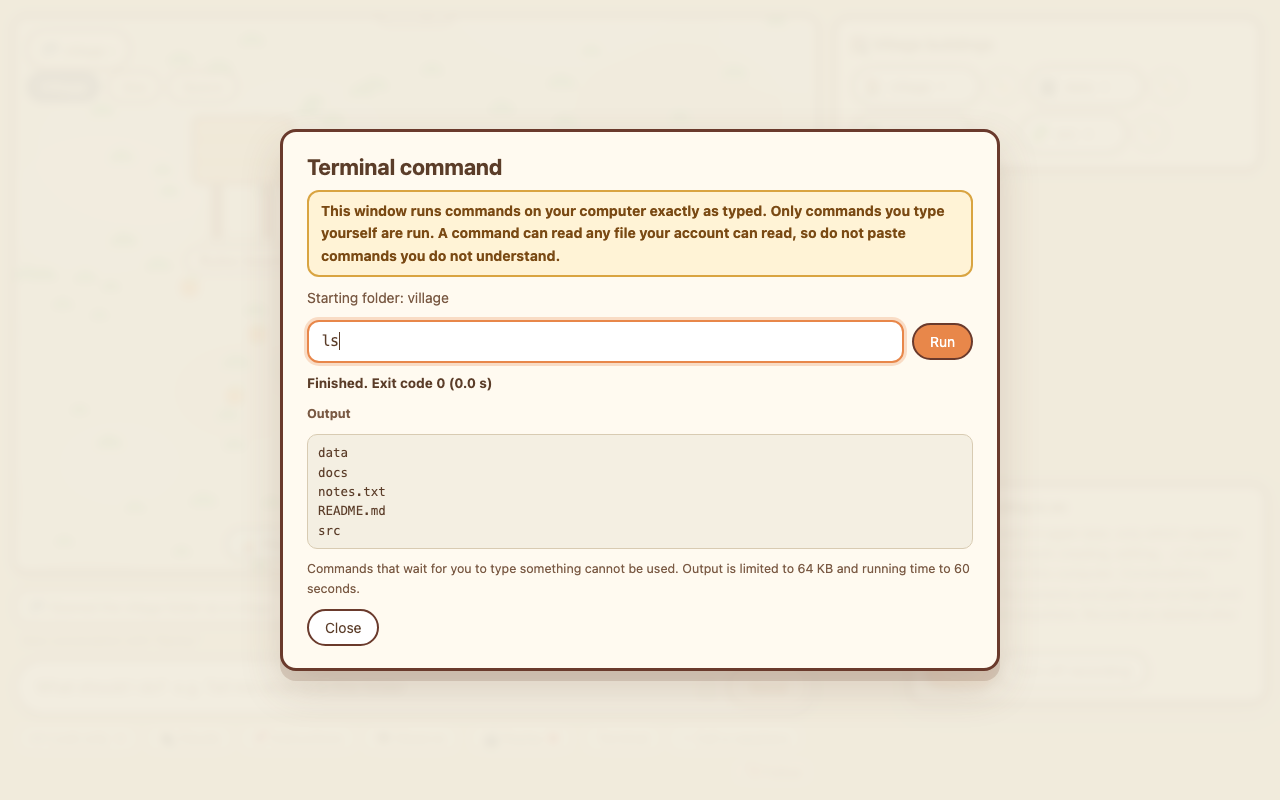
The terminal command box: a caution that commands run on your computer exactly as typed, the starting folder, an ls command that was run with a Finished, exit code 0 note, and the file names it printed

A terminal command box

The Terminal button opens a small box. Type a command that has to be run in a terminal.

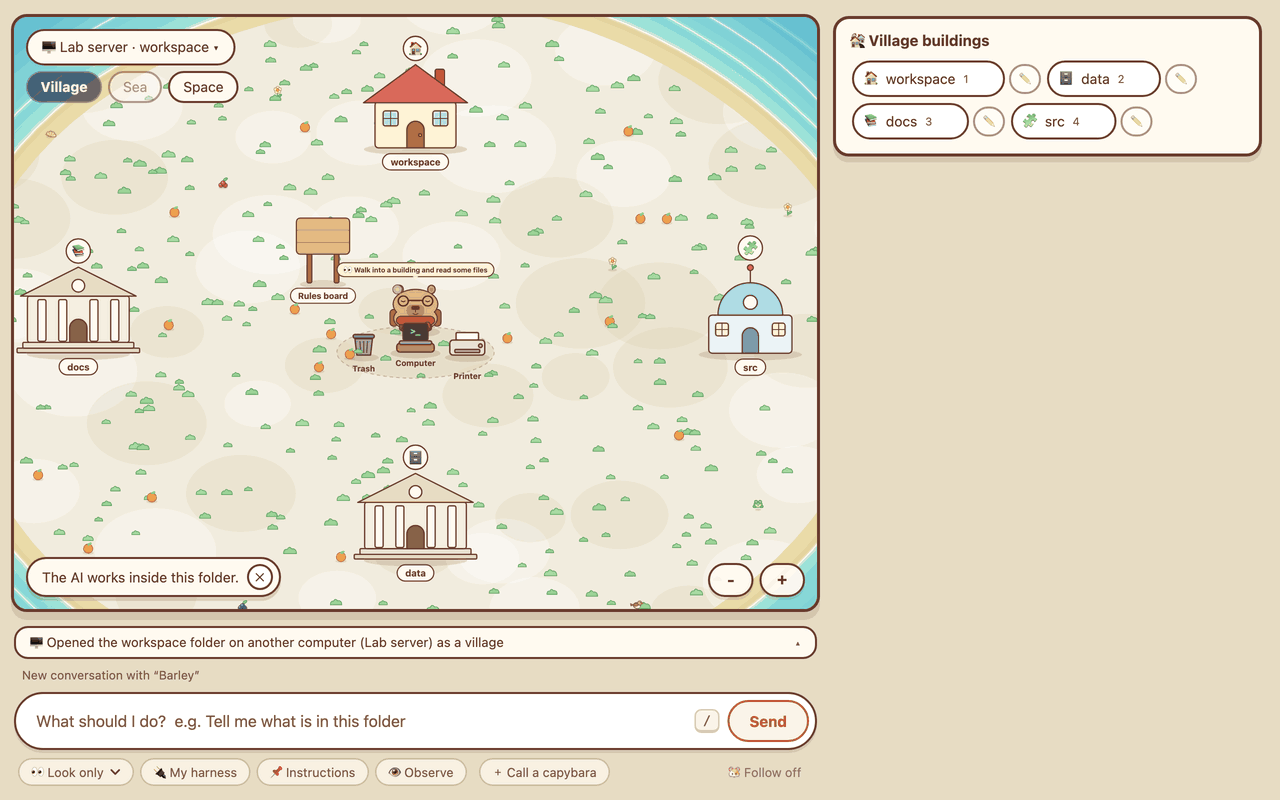
A folder on another computer (named Lab server) opened as a village, with the computer’s nickname at the top and a message below saying the folder was opened

Open a folder on another computer

If you can already connect to another computer over SSH, open its folder as a village too (macOS or Linux computers only). The app does not ask for passwords or create keys for you.

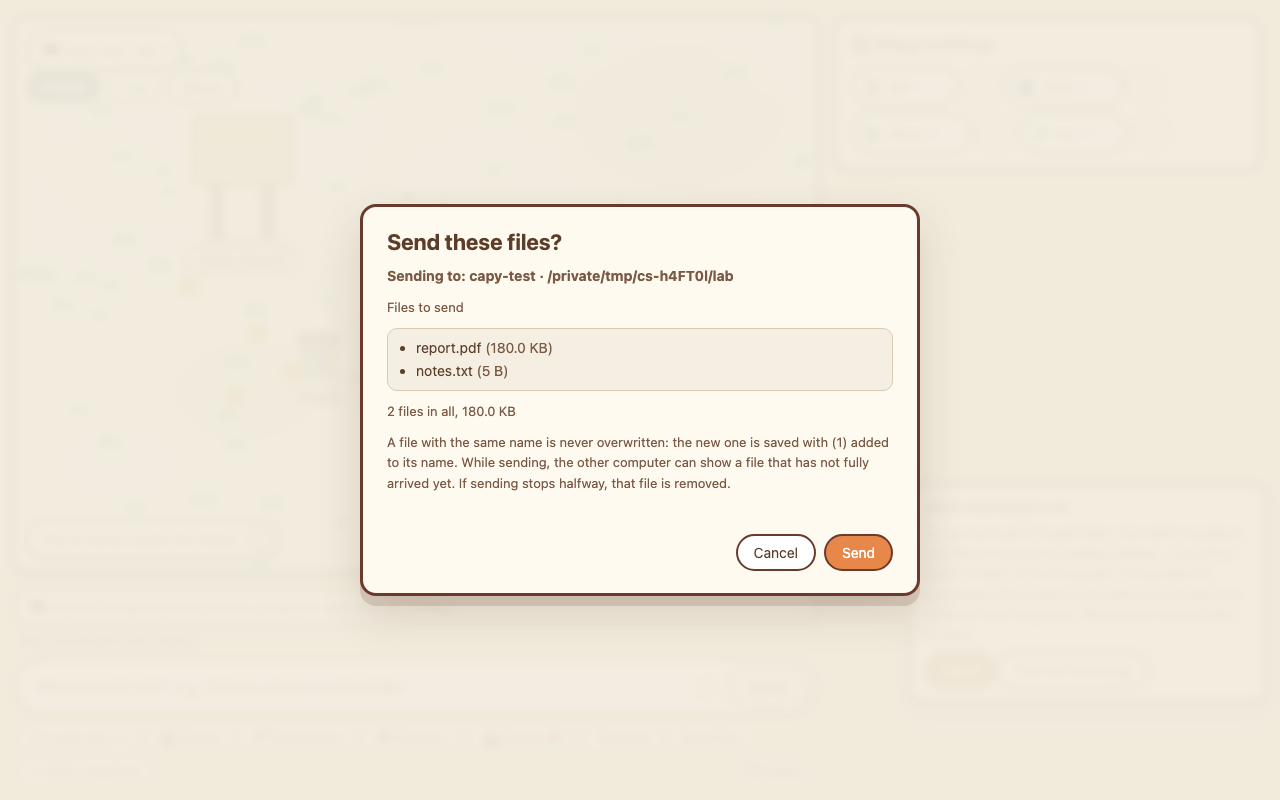
The Send files confirmation window: the computer and folder that will receive the files, the names and sizes of two files, a note that a file with the same name is never overwritten, and Cancel and Send buttons

Send files to another computer

In a village opened from another computer, drag files into the app and a window lists the file names, sizes, the computer and the folder. Nothing is sent until you press Send. A file with the same name is never overwritten: the new one is saved with (1) added. Only files can be sent, not folders.

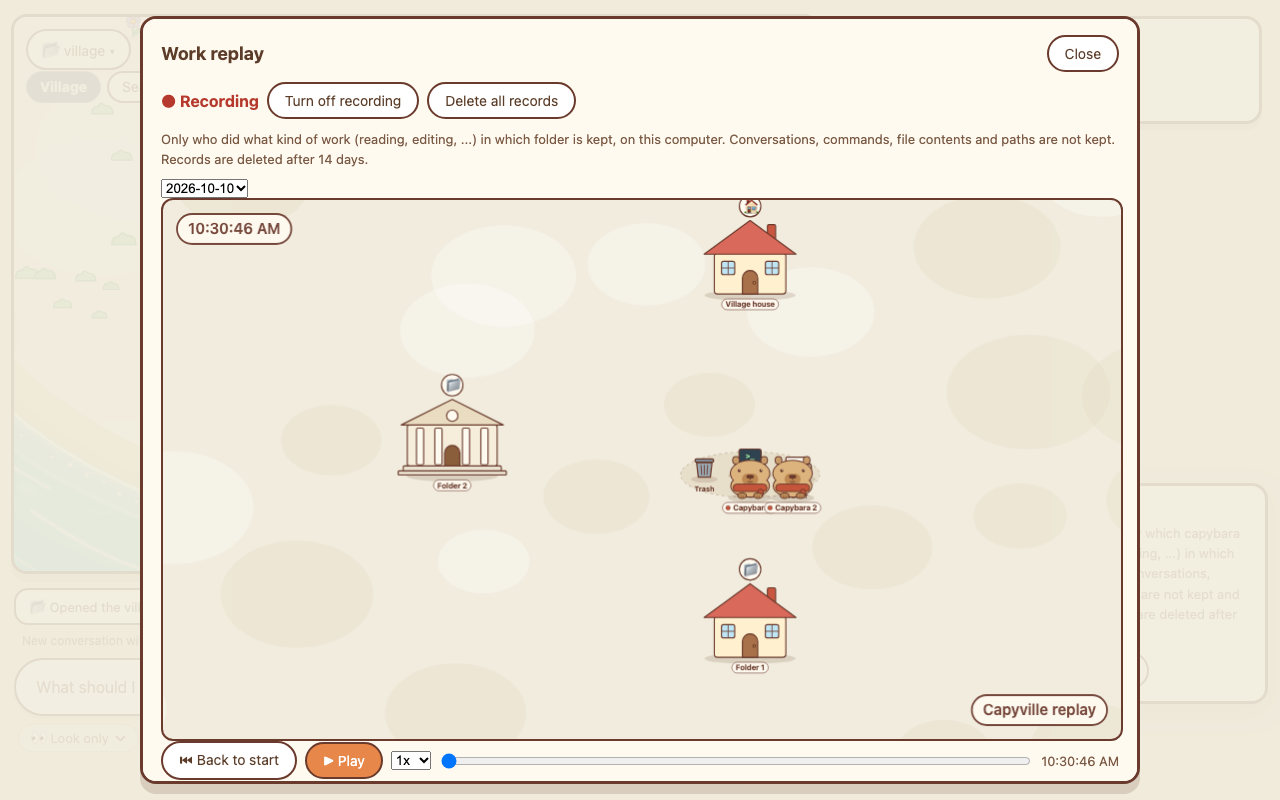
The village replay window: two capybaras working between the folder buildings, with Back to start and Play buttons and a time bar below, and a Recording label with Turn off recording and Delete all records buttons above

Work replay

The app records what your capybaras did by default, so you can watch it again later. The basic recording keeps only which capybara did what kind of work (reading, editing, …) in which folder — never conversations, commands or file contents. If you want to share your know-how, you can turn on Deep recording yourself: it also keeps conversations, commands, file paths and the start of edits (secret-looking text is masked). Records stay on this computer for 14 days and are not sent anywhere. You can turn recording off or delete everything in the replay window, and save a replay as a video (webm) in which folder and capybara names are hidden by default; a Deep recording video can show conversations, commands and paths, so check it before you share it.

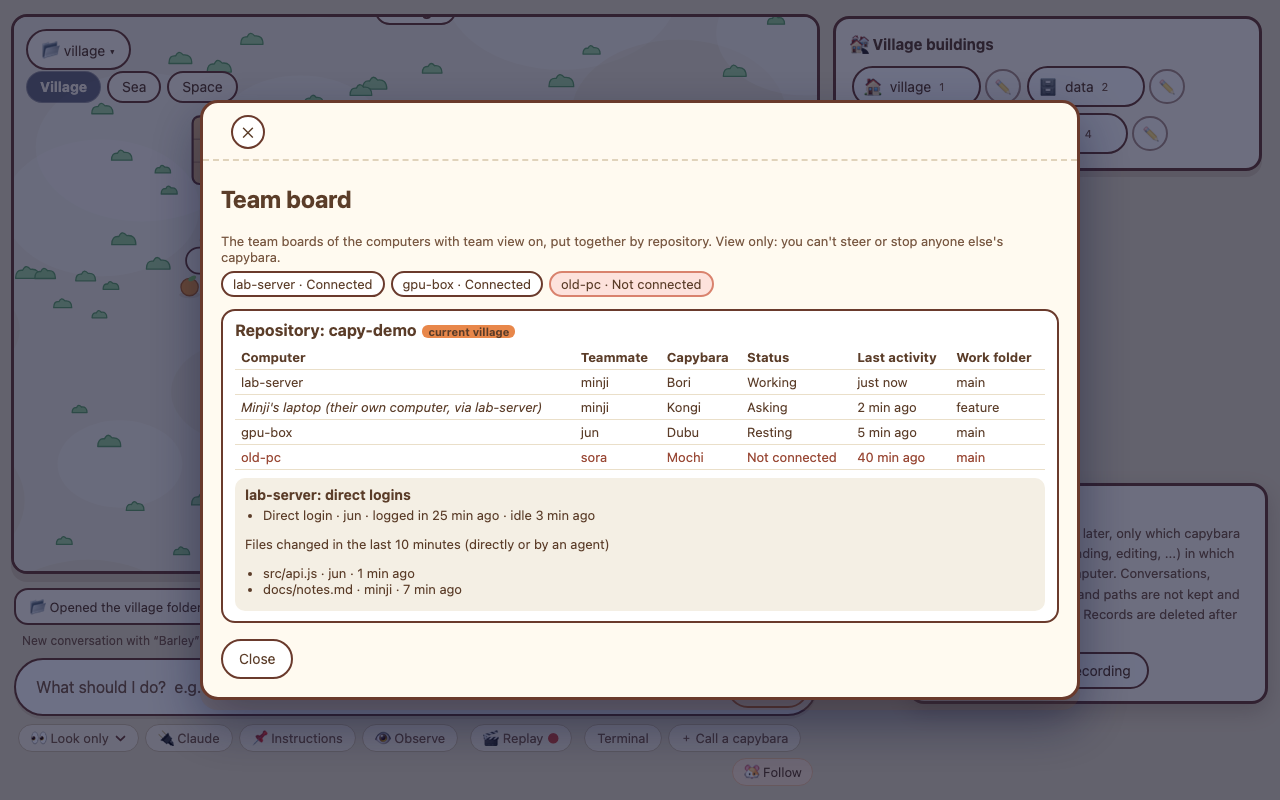
The team board window: a row of computer names with their connection state, a table with computer, teammate, capybara, status, last activity and work folder per line, and below it the direct logins and recently changed files; a computer that is not connected is shown in red

Team board for working together

On a computer several people share over SSH, you can watch your teammates’ capybaras work, but it is view-only: you cannot steer or stop them. “Team view” is off until you turn it on; once on, the app writes only fixed items such as your nickname and your capybaras’ names and states into the team folder on the server. Showing more (the kind of work, file names, one sentence of the AI’s answer) is turned on by you, level by level; your own messages and commands are never written. Direct logins and recently changed files are separate options you turn on yourself. The invite window shows the command that adds a teammate on the server; copy and run it yourself, or press Run to have the app do it (only with password-free sudo).

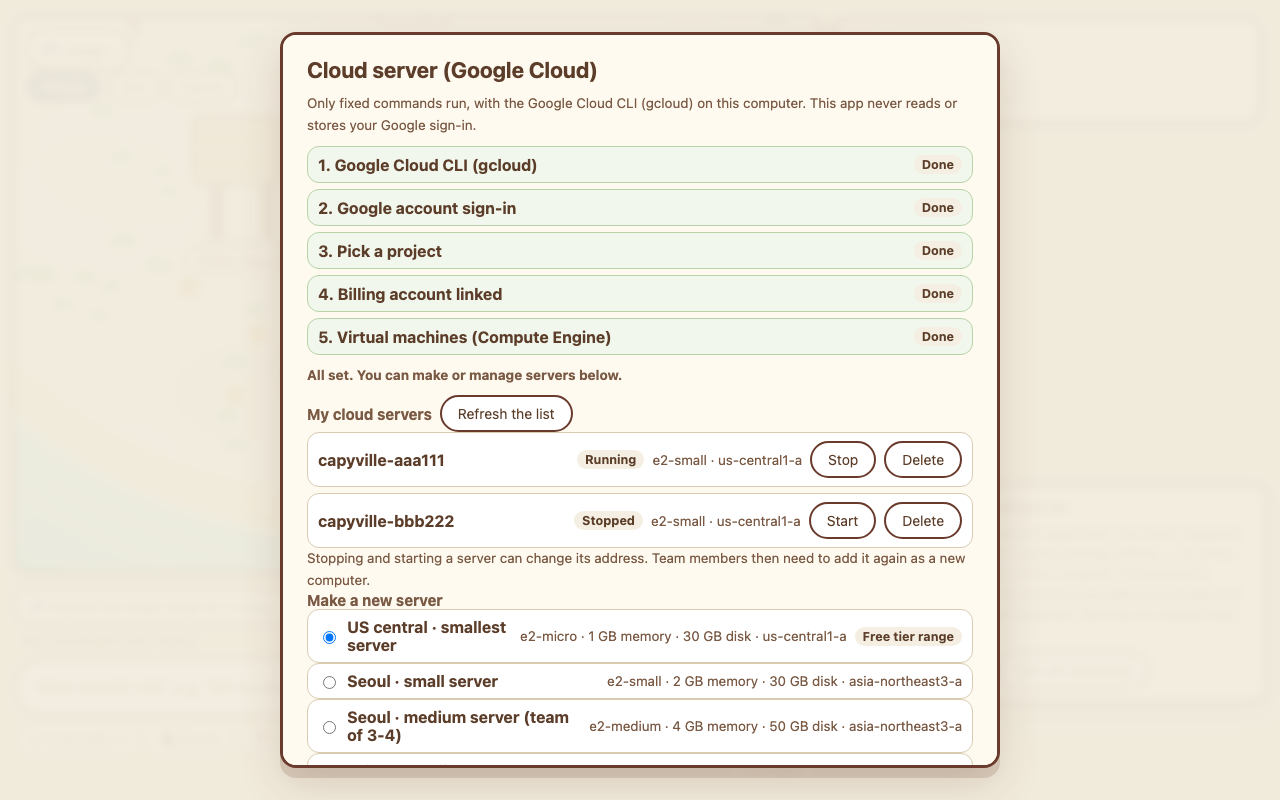
The cloud server window: five checks (Google Cloud CLI, Google account sign-in, pick a project, billing account linked, virtual machines) all marked Done, with two cloud servers (running and stopped) and the choices for making a new server below

Make a cloud server (Google Cloud)

With the Google Cloud CLI (gcloud) already on your computer, the app runs a fixed set of commands to make, list, stop, start and delete a server in your own Google Cloud project. It walks you through five checks one at a time: gcloud, Google sign-in, project, billing and Compute Engine. Sign-in happens in gcloud itself; the app never reads or stores your Google account. The server is created in your project and billed to your Google account. The app keeps only the project ID, region and server name on this computer.

Getting started

You need a Mac running macOS 13 or later (or a Windows 10 or later PC, beta), and Claude Code or Codex (either one). The app can help you install it.

  1. Download and open the app Mac: open the .dmg and drag Capyville into Applications. Windows: run the downloaded installer (.exe); if SmartScreen warns, choose “More info” and run it.
  2. Pick a folder, then choose an AI tool. On first launch, a “Choose an AI” window appears after you pick a folder. If no tool is installed, choose the tools you need (Claude Code, Codex) there, check the official command the app shows, and the app installs them for you. If Node.js (npm) is missing, the app can download and run the official installer after asking you first, and it also shows a link to the install guide.
  3. Sign in. Sign-in happens in your browser through the official tool itself, and the app does not take your account or tokens. The agent works only when you send a request.
  4. Type a task. For example: “tell me what is in this folder”.

Trust and privacy

Your files stay on your computer

Capyville does not upload your folders or data to its own servers. Apart from the official APIs (Claude, GPT), all work runs locally.

No automatic usage statistics

The app has no analytics or tracking, and this website uses none either. Only when it checks for new versions may the app fetch update information from the download address.

FAQ

Does it run on Intel Macs and Apple Silicon Macs?

Yes, there is a separate download for each. Use the Apple Silicon file for M1 and later, and the Intel file for older Macs. The app needs macOS 13 or later.

Does it run on Windows?

Yes, Windows 10 or later (64-bit only). It is a beta, so it may be unstable.

Windows shows a warning when I run the installer. Is that okay?

The Windows installer is not code-signed yet, so SmartScreen may show a warning about an unrecognized app. That is expected for now. Download it only from this page, and if you decide to go ahead, choose “More info” and then run it.

Can I connect to a Windows computer remotely?

No. Opening a folder on another computer works only with macOS or Linux computers. Windows computers are not supported as the remote side.

Is it free?

It is free at the moment. If that changes, we will announce it on this website in advance.

Which agents does it work with?

Capyville does not include an AI of its own. It works with agents that are installed on your computer. If they are not installed yet, the app can install Claude Code and Codex for you after you check the official command.

  • Claude Code and Codex: connected through the official tools. Sign-in is handled by each tool.
  • OpenCode (beta, unstable): not tested enough yet, so problems may occur. The app’s modes (such as Look only) may not be fully kept.
  • My harness: connect a command-line agent you built yourself through a settings file (harnesses.json) and watch it in the same village. The “Choose an AI” window in the app shows how to connect it.